Interface & Application Programming
During the class of this assignment, Neil has explained to us all the languages that exist to do interfaces programming. Then he showed us the different user interfaces, data and devices. Has continued to show us programs for graphics, multimedia, VR, mathematics, performance and deploy. After this he explained the assignment & I have begun to raise a lot of doubts about where to start and how to face this assignment.
Processing
I start this week by loocking on processing it's a visual programation software working samely as the arduino IDE
After read some example & explainations on how processing works let's go a try.
I found a great help on the Processing Cheat Sheet fron Openlab.
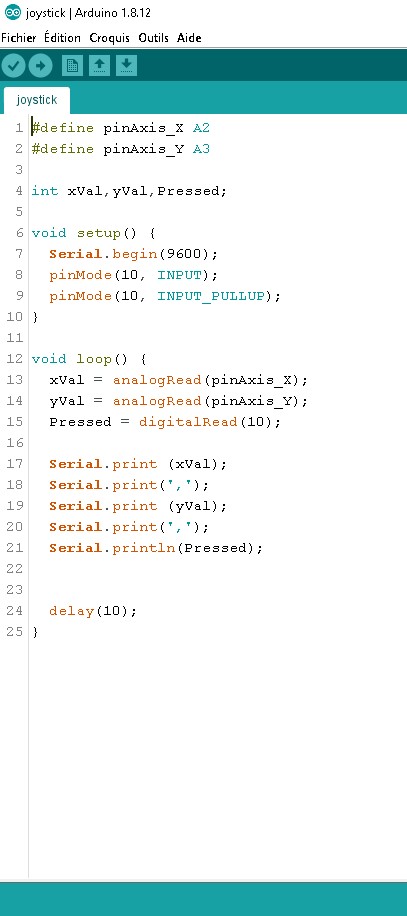
I use the arduino code i make on Week 9 for the joystick input.
#define pinAxis_X A2
#define pinAxis_Y A3

int xVal,yVal,Pressed;

void setup() {
Serial.begin(9600);
pinMode(10, INPUT);
pinMode(10, INPUT_PULLUP);
}

void loop() {
xVal = analogRead(pinAxis_X);
yVal = analogRead(pinAxis_Y);
Pressed = digitalRead(10);

Serial.print (xVal);
Serial.print(',');
Serial.print (yVal);
Serial.print(',');
Serial.println(Pressed);


delay(10);
}
This code send the analog value of the X & Y axis of the joystick on a Serial. To use it on Processing i first have to setup the capacity for him to read a serial.
import processing.serial.*;
Serial myPort;
After i create a serialEvent to put the different data from the joystick in a array i could use.
void serialEvent(Serial myPort) {
String inString = myPort.readStringUntil('\n');
if (inString != null) {
inString = trim(inString);
int[] data = int(split(inString, ","));
if (data.length >=1) {
dataX = data[0];
dataY = data[1];
}}}
On the setup part of my code i programme the windows interface size(600,600); for a 600 pixels square size & background(0); a black background colors.
I also set who is the port & the speed i use for the serial communication myPort = new Serial(this, "COM8", 9600);
And finally on the Draw() part ( that correspond to the loop part on arduino...) i use my data to move a grey spot when my joystick move.
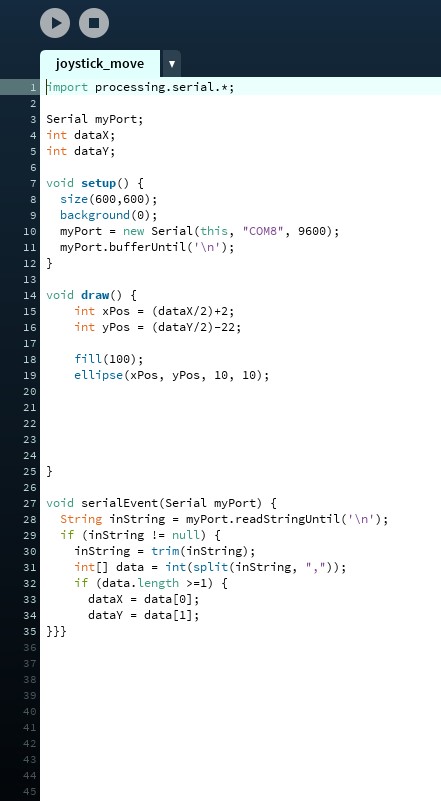
Here is the full code & a video of the interface
import processing.serial.*;

Serial myPort;
int dataX;
int dataY;

void setup() {
size(600,600);
background(0);
myPort = new Serial(this, "COM8", 9600);
myPort.bufferUntil('\n');
}

void draw() {
int xPos = (dataX/2);
int yPos = (dataY/2);

fill(100);
ellipse(xPos, yPos, 10, 10);


}

void serialEvent(Serial myPort) {
String inString = myPort.readStringUntil('\n');
if (inString != null) {
inString = trim(inString);
int[] data = int(split(inString, ","));
if (data.length >=1) {
dataX = data[0];
dataY = data[1];
}}}
HTML & JAVSCRIPT
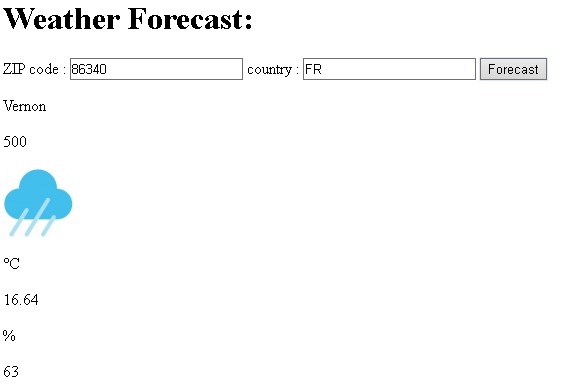
This week i also start to work on my Final Project interface, using JavaScript & html to collect weather information on a Web API.

You could find the files Here
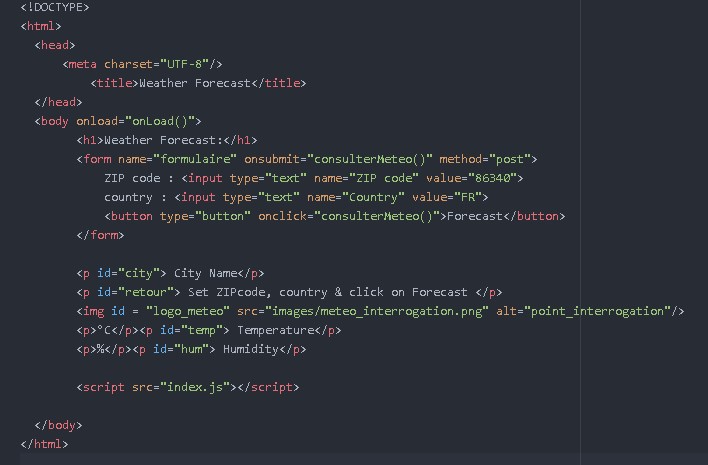
Here the HTML part:
here the JS part :
function onLoad(){
//console.log("it Works !");
}


function consulterMeteo() {
var zip = document.forms["formulaire"]["ZIP code"].value;
var country = document.forms["formulaire"]["Country"].value;
var requete = 'http://api.openweathermap.org/data/2.5/weather?zip='+zip+','+country+'&units=metric&appid=**********'; //Creation de la requete avec les coordonnees du formulaire et la cle : 6a7fc2326fc185ce8447fd9699807405

var xhr = new XMLHttpRequest();   // Instanciation d'une requete html
xhr.open('POST', requete);
xhr.send(null);
console.log("envoi de la requete");
xhr.onreadystatechange = function() {
if (xhr.readyState == 4 && xhr.status == 200) {
var retour = JSON.parse(xhr.responseText);
var city = retour.name;
document.getElementById('city').innerHTML = city;
var temp = retour.main.temp;
document.getElementById('temp').innerHTML = temp;
var hum = retour.main.humidity;
document.getElementById('hum').innerHTML = hum;
var id = retour.weather[0].id;
document.getElementById('retour').innerHTML = id;
var image = document.getElementById("logo_meteo");
//image.src="images/full_cloud.png";
if (id>=200 && id <=232){image.src="images/thunder.png";}
if (id>=300 && id <=531){image.src="images/rain.png";}
if (id>=600 && id <=622){image.src="images/snow.png";}
if (id>=701 && id <=781){image.src="images/fog.png";}
if (id==800){image.src="images/clear_sky.png";}
if (id==801){image.src="images/middle_cloud.png";}
if (id>=802 && id <=804){image.src="images/full_cloud.png";}

}
};
}
Stay a lot of work integrating it on a WebSocket for my ESP but for the moment i don't have any ESP board for really try....
Group assignement:
The problem i have for this assignemt like the other group assignement is i'm a solo man group.
But the solution JB gave me is to learn about other students, ok let's go to check who made what and try to learn more about different interface making.
Hiroaki from Kamakura have make a great work on Blynk interfacing with a satshakit on a breadboard.
As i see on his assignement "Blynk" give a really nice & easy way to make a smart interface with an arduino or other devboards.
I also take a long look on the work of Adrian from leon. He also make some processing work on this week,but also work on micopython with a ESP32, a really nice work. But i'm more on the MIT app inventor work he doing.
As i look at it, it locking more intuitive with a more graphical interfacing. Really interresting for me.
I'm also interseted by the work make last years by Benjamin at la Machinerie. He work on a Arduino YUN, he explain to me is a arduino devboards make to prototype Networked devices more easily.
That really interresting.